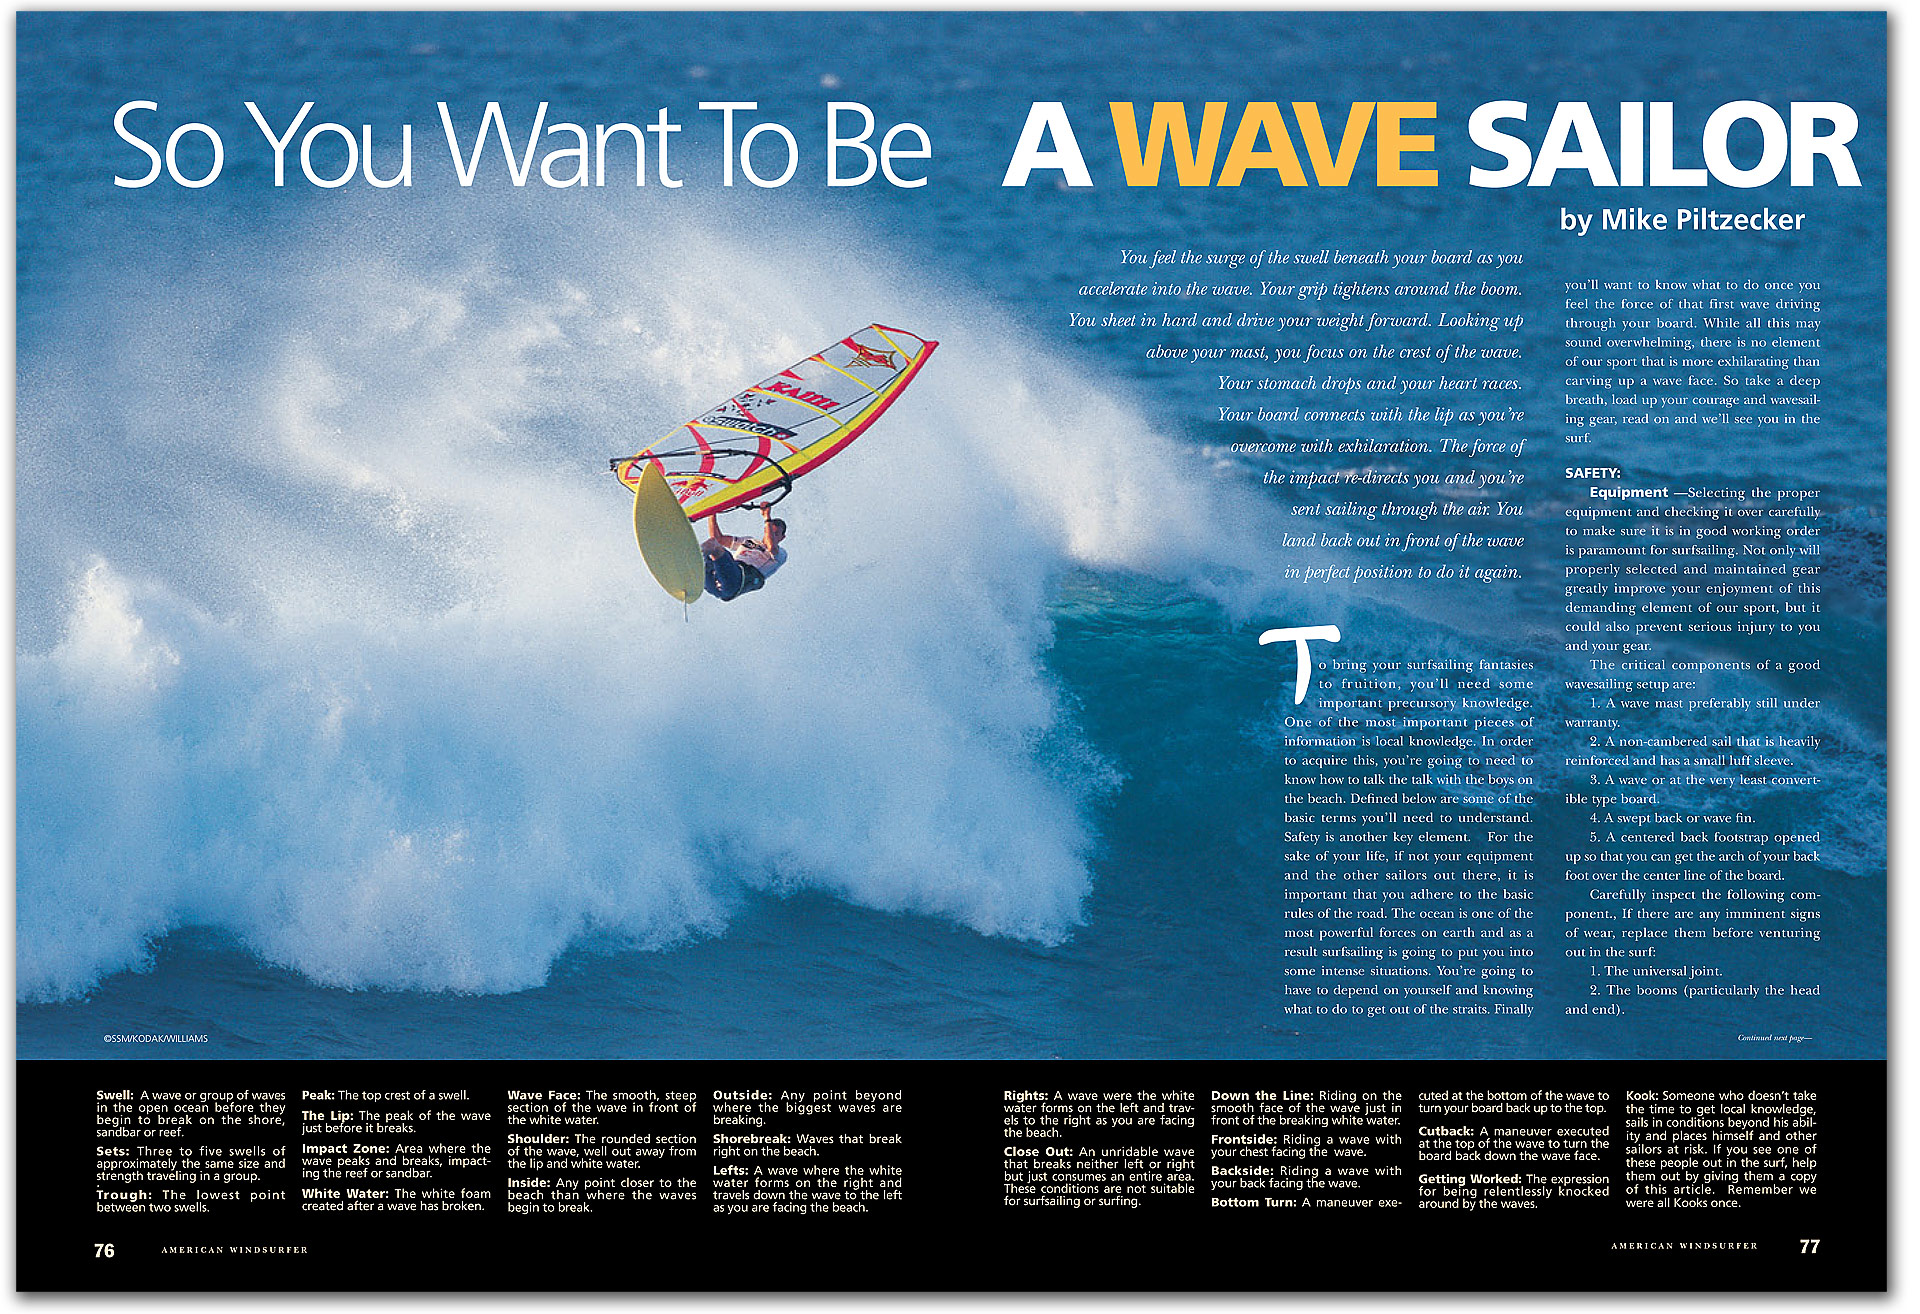
You feel the surge of the swell beneath your board as you accelerate into the wave. Your grip tightens around the boom. You sheet in hard and drive your weight forward. Looking up above your mast you focus on the crest of the wave. Your stomach drops and your heart races. Your board connects with the crest as you’re overcome with exhilaration. The force of the impact re-directs you and your sent sailing through the air. You land back out in front of the wave in perfect position to do it again.
TO BRING YOUR surfsailing fantasies to fruition you’ll need some important precursory knowledge. One of the most important pieces of information is local knowledge. In order to acquire this your going to need to know how to talk the talk with the boys on the beach. Defined below are some of the basic terms you’ll need to understand. Safety is another key element. For the sake of your life if not your equipment and the other sailors out there it is important that you adhere to the basic rules of the road. The ocean is one of the most powerful forces on earth and as a result surfsailing is going to put you into some intense situations. You’re going to have to depend on yourself and knowing what to do to get out of them. Finally you’ll want to know what to do once you feel the force of that first wave driving through your board. While all this may sound overwhelming there is no element of our sport that is more exhilarating then carving up a wave face. So take a deep breath, load up your courage and wavesailing gear, read on and will see you in the surf.
SURFSAILING TERMS:
Swell: A wave or group of waves in the open ocean before it begins to break on the shore, sandbar or reef.
Sets: Three to five swells of approximately the same size and strength traveling in a group.
Trough: The lowest point between two swells.
Peak: The top crest of a swell.
The Lip: The peak of the wave just before it breaks.
Impact zone: Area were the wave peaks and breaks, impacting the reef or sandbar.
Whitewater: The white foam created after a wave has broken.
Wave Face: The smooth, steep section of the wave in front of the whitewater.
Shoulder: The rounded section of the wave well out away from the lip and whitewater.
Inside: Any point closer to the beach than where the waves begin to break.
Outside: Any point beyond where the biggest waves are breaking.
Shorebreak: Waves that break right on the beach and break equipment.
Lefts: A wave were the white- water forms on the right and travels down the wave to the left as you are facing the beach.
Rights: A wave were the white-water forms on the left and travels to the right as you are facing the beach.
Close Out: A wave that breaks neither left or right, one that breaks over an entire area.
Down the Line: Riding on the smooth face of the wave just in front of the breaking whitewater.
Frontside: Riding a wave with your chest facing the wave.
Backside: Riding a wave with your back facing the wave.
Bottom Turn: A maneuver executed at the bottom of the wave to turn your board back up to the top of the wave.
Cutback: A maneuver executed at the top of the wave to turn the board back down the wave face.
Getting Worked: The expression for being relentlessly knocked around by the waves.
Kook: Someone who doesn’t get local knowledge, sails conditions beyond their ability and places himself and other sailors at risk. If you see one of these people out in the surf help them out by giving them a copy of this article.
Advertisement
Safety:
Equipment – Selecting the proper equipment and checking it over carefully to make sure it is in good working order is paramount for surfsailing. Not only will properly selected and maintained gear greatly improve your enjoyment of this demanding element of our sport, but it could also prevent serious injury to you and your gear.
The critical components of a good wavesailing setup are:
A wave mast preferably still under warranty.
A non-cambered sail that is heavily reinforced and has a small luff sleeve.
A wave or at the very least convertible type board.
A swept back or wave fin.
A centered back footstrap opened up so that you can get the arch of your back foot over the center line of the board.
Carefully inspect the following components, if there are any imminent signs of wear replace them before venturing out in the surf:
The universal joint.
The booms (particularly the head and end).
All lines (outhaul, downhaul, inhaul, harness).
Fin box and mast track.
Take the time and effort to balance and tune your rig on the beach before heading out. The conditions on the water during a surfsailing session won’t be conducive to equipment adjustments. Local Knowledge – Currents, reefs, sandbars, tides, and wind conditions change dramatically from launch to launch even within a local area. These changes drastically effect the viability of surfsailing in those spots. Don’t be intimidated to ask the local boys for their input. They’re usually stoked to tout their knowledge of the area and will probably give you a little more respect out on the water if they recognize your face from the beach.
Observation – Take the time, at least twenty minutes or more, to watch the conditions before you rig up and head out. Watch the other sailors to gage equipment selections and where to launch. Some quality time on the beach can save you a lot of swimming time on the water.
Know Your Limits – If your butt puckers-up just looking at the conditions, you’re probably better of staying on the beach.
Never Let Go – If and when you get knocked down in the surf hang on to your equipment as if your life depends on it, as it very well may. Your equipment is your life support system. Even if it is broken it will at least float you back to the beach, which beats open ocean swimming any way you look at it.
Waterstarting In The Impact Zone – Grab onto the tip of your mast and position yourself so your gear is not between you and the next wave. Let the waves wash youto the inside of the zone. Clear your sail quickly and aggressively, then waterstart so you are headed back toward the beach. This will allow the waves to assist you with your waterstart.
Rules Of The Road – The sailor going out through the surf, regardless of his tack (port or starboard), has the right of way over the sailor coming in on a wave. The sailor closest to the whitewater has the right of way over the sailor who is further away from the whitewater and on the less steep section of the wave.
Getting out:
Shore Break Launch -To get yourself and your equipment out beyond this stuff requires a little bit of skill and a lot of pure aggressive determination. Stand at the water’s edge and patiently wait until you see a lull in the waves approaching the beach. Then don’t walk, charge into the water as hard and fast as you canholding your equipment well above the water’s surface. As soon as your board touches the water it will be effected by the rip tides, so keep your hand on the back footstrap and waterstart as fast as you can. In some cases it is best to swim your gear out beyond the largest sections of shorebreak and attempt to waterstart out beyond the shorebreak. This is particularly true if you are not very experienced launching in these conditions or if there are onshore winds.
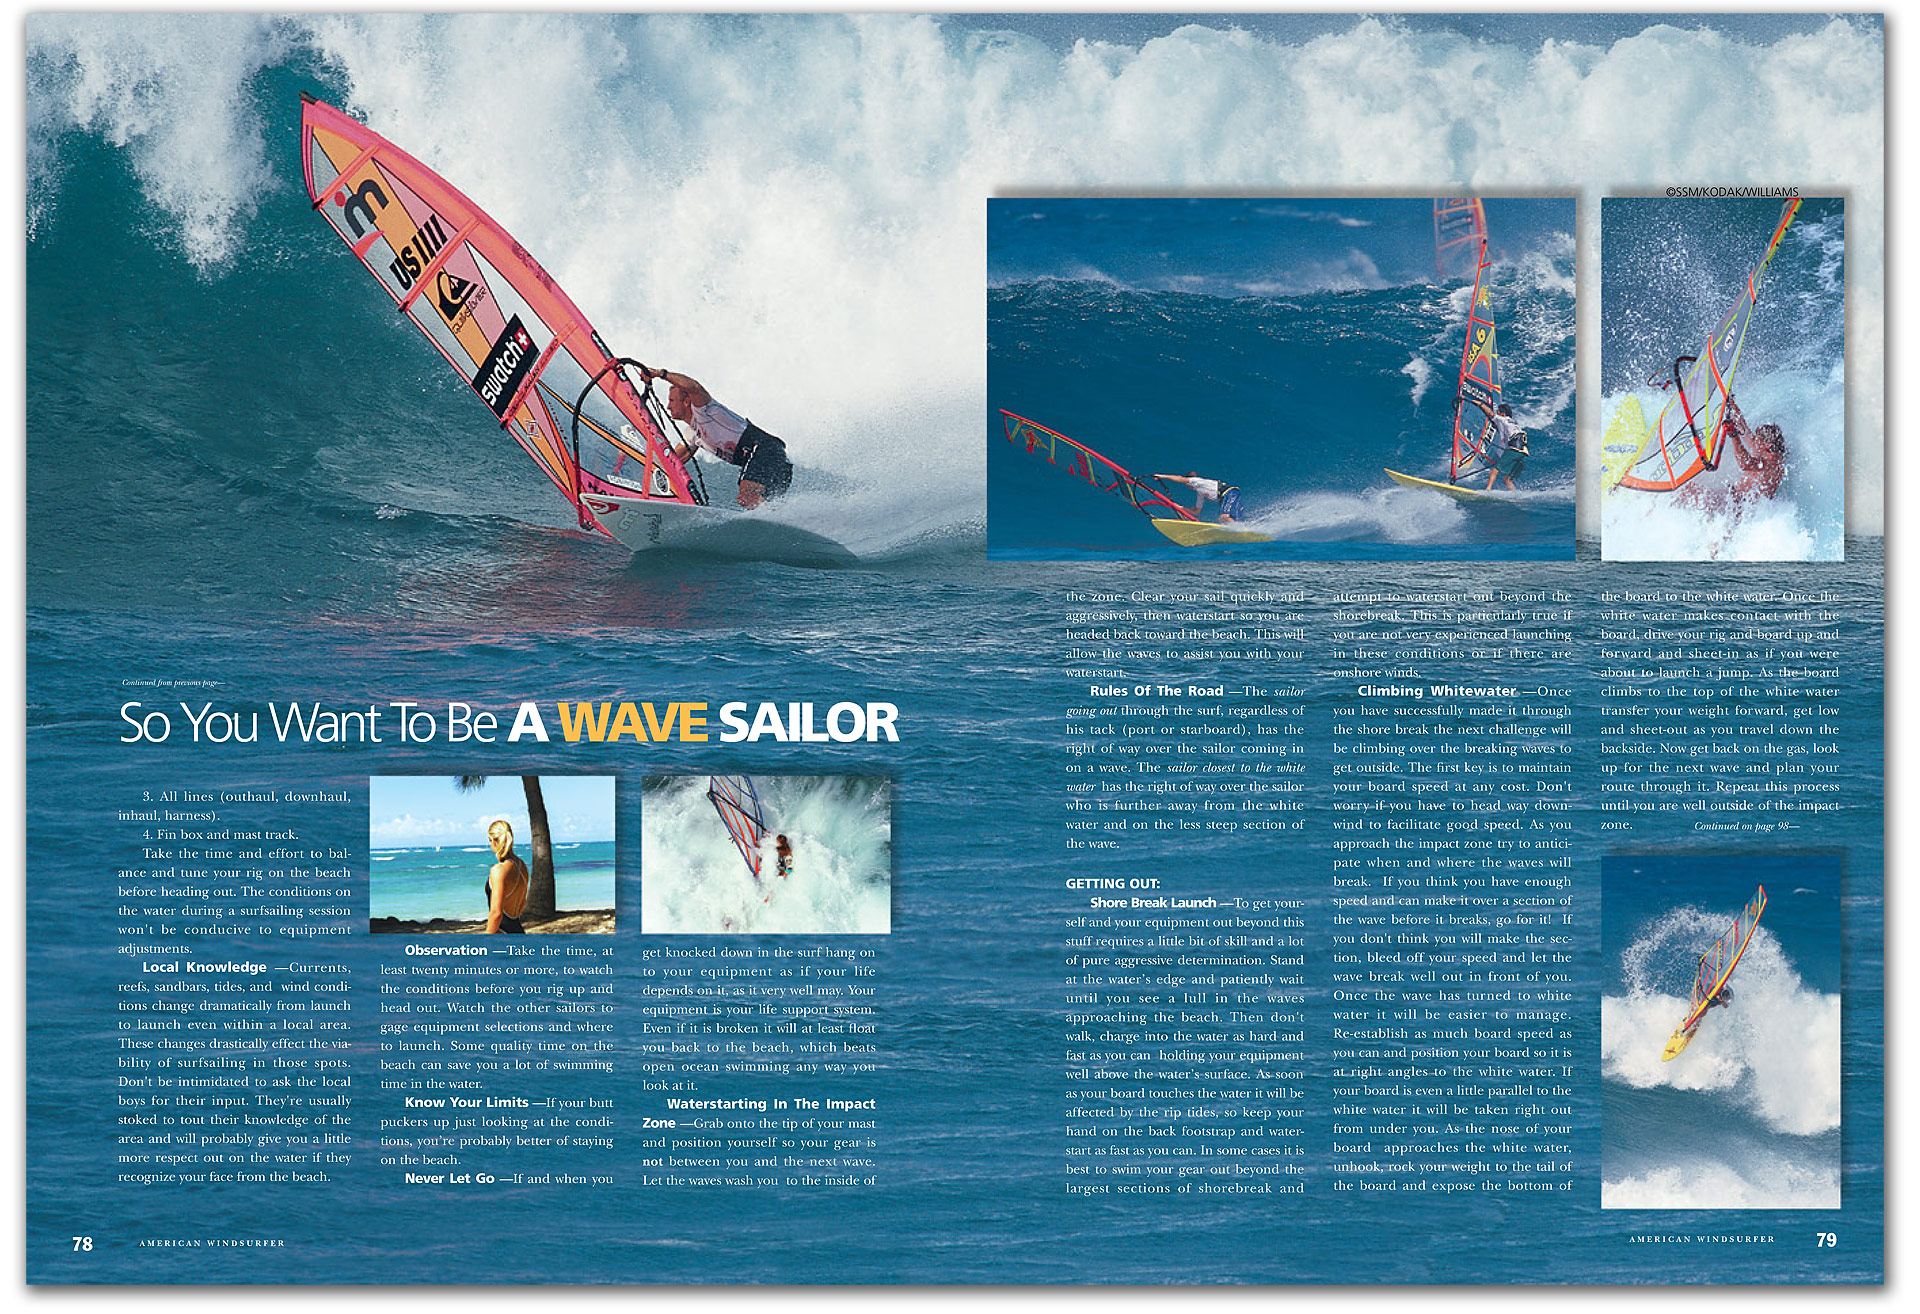
Climbing Whitewater – Once you have successfully made it through the shore break the next challenge will be climbing over the breaking waves to get outside. The first key is to maintain your board speed at any cost, don’t worry if you have to head way downwind to facilitate good speed. As you approach the impact zone try to anticipate when and where the waves will brake.If you think you have enough speed and can make it over a section of the wave before it breaks, go for it!If you don’t think you will make the section, bleed off your speed and let the wave break well out in front of you. Once the wave has turned to whitewater it will be easier to manage.Reestablish as much board speed as you can and position your board so it is at right angles to the whitewater, if your board is even a little parallel to the whitewater it will be taken right out from under you. As the nose of your boardapproaches the whitewater unhook, rock your weight to the tail of the board and expose the bottom of the board to the whitewater. Once the whitewater makes contact with the board, drive your rig and board up and forward and sheet-in as if you were about to launch a jump. As the board climbs to the top of the whitewater transfer your weight forward, get low and sheet-out as you travel down the backside. Now get back on the gas, look up for the next wave and plan your route through it. Repeat this process until you are well outside of the impact zone.
(enlarge)
Selecting and Riding Waves:
Sets Of Waves – Once your outside, scan the horizon for a good size set. Then jibe well in front of the second or third wave in the set and get comfortable.
Reading Waves – Continually look back over your shoulder at the wave approaching you from behind. Try to gage its speed, size and shape. Look for the steepest section of the swell as well as were it starts to mellow out into a nice shoulder. This will give you a feel as to weather the wave will be a right or left and which direction you will be heading down the line.
Catching Waves – Begin to manipulate your speed and allow the wave to catch up to you. This can be achieved by sheeting out slightly or heading upwind. The most common error rookie surfsailors make is relying to much on their sail and not allowing the power of the wave to take over. As you feel the force of the wave propel you through the water, the sail should become neutral feeling. Bring your body weight in over the board and begin to experiment with turning. Weight your toes or heels to drive the board higher up on the swell toward the peak or further down the wave into the trough. As you approach the impact zone keep an eye on the wave in front of you. Note where and how it breaks (right, left, closeout). Now steer your board to the steepest section of the swell that your riding and in the same general area where you saw the wave in front of you begin to break.As the wave gets steeper and begins to break, point the nose of your board down the line toward the waves shoulder. Try to set the rail of your board so it bites into the wave a bit. This will generate speed and set you up for a nice ride on the wave face. Do Not point the board straight down the wave toward the trough as this will set you up for a ride straight to the bottom of the ocean.
Bottom Turns – Once your heading down the line, it’s time to have some fun turning on the face. As the board approaches the bottom of the wave drive your weight forward, get low, sheet in and weight the rail closest to the wave. This will start to drive your board back up the wave face, extend your arms and legs in the direction of the lip and through your board and rig toward it.
Cutbacks – As the nose of your board approaches the lip, rotate your entire torso and rig back around toward the trough. Compress yourself into a ball and the wave will do the rest. After a fewsessions you’ll be linking your bottom turns and cut backs together and carving up the waves like you’ve been doing in your fantasies.